Intelligence plugins
Types of intelligence plugins
Intelligence plugins use an intelligence model as data source. An intelligence model defines the user features that will be used by the plugin. An intelligence model can either have a goal, or no goal at all such as for unsupervised models like clustering.
A few examples of available intelligence goals are (which in the dataset translate to being either true or false):
- User did event
X. - Sum of some event property for user is at least
X. - User came back after
Xdays. - User had
Xsessions. - User complete step
Xof a funnel. - Any custom goal defined by SQL.
In addition each intelligence plugin can have some extra features:
- Deployable — For example a recommender plugin may be deployed in production, so that realtime recommendations can be made, optimize for one of the goals above.
- Adding user data — For example a prediction may be made for all existing users in the dataset, by adding a user property that contains a score from 0 to 1 being the likelihood of the user converting to one of the goals above.
Running a plugin
Before your start using a plugin with the API, it's recommended to first run a Custom Intelligence analysis from the UI with the plugin, so you have an idea of what results it provides.
Running a plugin is done by calling the async function PluginData.get, with its first parameter being a permalink string pointing to the plugin to run. The permalink may be prefixed with a name and a / character which means it's an external (third-party) plugin that is not part of the current Template.
Below is an example of running a clustering plugin, with the goal being user did event payment:
The first argument "plugins/clustering" means we run a third-party clustering plugin.
The second argument is an options object. The options object generally contains two keys:
data: either a custom intelligence object or a bookmark ID string. The example aboves uses a custom intelligence object with the eventpaymentas the conversion goal.datacan also be a string containing a bookmark ID, which can be found by looking up the intelligence bookmark using theExample code:dropdown at the Insight creation page.params: an object containing a key/value pair of plugin input parameters. The plugin above has only one parameter calledcluster_count— a simple numeric value, indicating the maximum number of clusters to detect.
Finally we use the renderAll(true) helper function from clusteringResults to visualize the results of the clusters in JSX.
The easiest way to get a quick code example of how to use a specific plugin, its helper functions and input parameters, is to visit the Insight creation or edit page. Then select from the Example code: dropdown a local or third-party plugin.
Or simply use a bookmarked intelligence result as data input. The bookmark ID can be looked up through the Example code: dropdown.
Intelligence plugin input data
Intelligence plugins can in addition to native params such as the number of clusters, also be supplied with input data. Input data for intelligence plugins are always based on a specific event property.
For example, a recommender plugin may use the color property of the view_item event, as input data to build a recommender model based on the color of items users have interacted with.
Intelligence plugin input data is identified as such by using the Example code: dropdown on the Insight creation page, and picking the plugin. Under the params object in the example code shown, it will be indicated with the comment // Plugin input data (text) and the type such as text or numeric. When plugin input data is optional it's also indicated in the comment.
Below an example of supplying input data for the recommend_text_field and recommender_item_text1 fields to the recommender plugin:
To pass through questions variable directly to input data plugin params, see the Plugin input parameters from variables section later.
Hyper-parameters
Hyper-parameters are a special case — their optimal value is determined by the platform by experimenting with different values.
This means that you'd almost always want omit hyper-parameters from the params object at all, only that way their optimal value will be determined. If you set a fixed value, that will one be used instead.
So when looking up the plugin Example code: from the Insight creation page, pay attention to any params with comment // Hyper-parameter, and make sure omit them from params.
important
Hyper-parameters — even if optional — cannot be set to null. If set to null the parameter value will still be determined automatically. So there is no way to skip using a hyper-parameter.
Optional plugin parameters
Some plugin params can be optional such as sensitivity and predict_additional_value in the example below, indicated by the comment // Optional when looking up the example code:
When an optional param is not supplied at all, and it is of a simple type (number/text/boolean/date), it will be given its default value. For optional input data, the field is not used at all if left out. Thus in the example below the optional parameters sensitivity and predict_additional_value are not supplied, and for sensitivity it ends up using the default value of 10, while predict_additional_value will not be used at all:
In order to not use an optional param at all, supply null as value. For input data params we can either leave the param out or set it to null — in both cases the param will be unused because input data doesn't have a default value. See example below:
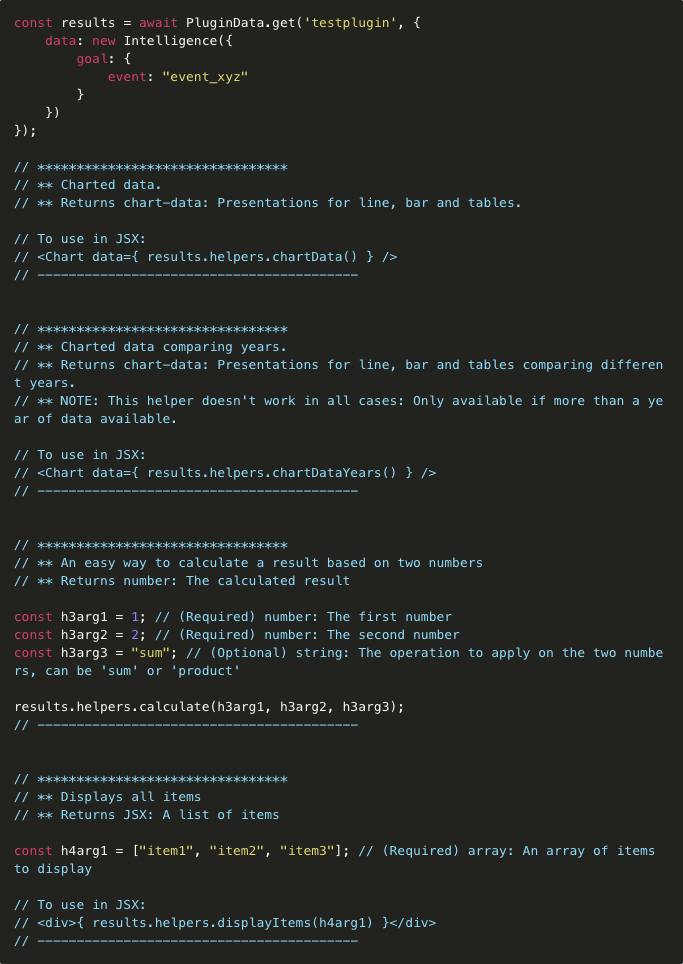
Plugin helper functions
Often plugins come with helper functions. Helpers prevent code duplication and make it easy to display certain parts of a plugin output, such as a table displaying the different cluster properties.
Helper functions are accessible directly on the plugin result object, under the helpers object. When a plugin has documented helpers, they will be shown when you choose the plugin from the Example code: dropdown.
Here is an example using the renderAll(true) helper function from the clustering plugin to display the different clusters:
Here is an example plugin shown its documented helper functions:
Error handling
For plugins it's important to first check if there is an error before continuing with any code that depends on and comes after the plugin is executed.
Because a failed PluginData.get returns an error object, we can return it directly in the JS code. As explained in the adding code page, an error object can be returned directly, so that it gets picked up and the error is shown to the end-user.
To check if the plugin has an error we first need to use Utils.validResult(pluginResults). This is usually the preferred way, because plugins usually return more detailed and actionable errors for the end-user:
Alternatively we can return a string directly, which is displayed as error to the end-user:
Or we can return an error object with more details:
Notifications
Some plugins may generate notifications. You can check if there are any by using the notifications property of the plugin results object.
Normally notifications from individual plugins do not end up as Insight notifications, so effectively they will stay hidden.
This allows you to decide in the Insight which notifications from which plugins you want to be visible or filter out, instead of all notifications from all plugins automatically showing up all the time.
To pass through notifications from a plugin to the Insight, use the following code:
The notifications property of the plugin result is an array of notification objects, similarly to what is described in the Insight Notifications section.
Additionally you can loop through the notifications array, and add only only high-priority ones or with status warning, for example:
Constructing an Intelligence object
The data source for intelligence plugins are intelligence objects. Intelligence objects can be either made using the API or by retrieving an existing bookmarked one that was made through the UI.
Intelligence bookmarks
The easiest way to work with Intelligence objects that involves as little code as possible is to make one from the UI first. Use the Custom Intelligence option from the Custom top menu. Once the results are in, click Bookmark.
Because intelligence bookmarks also work with Template Variables, end-users can change the questions and those changes will be reflected when you retrieve or use the bookmark.
To get the bookmark ID, edit your Insight and use the Example Code dropdown to select the bookmark and copy the bookmark ID string.
Once you have the bookmark ID, you can use it anywhere instead of an intelligence object:
Once you have the intelligence object from a bookmark, you can modify it:
To run a plugin using the bookmark ID directly first specify the plugin in the first argument, then the bookmark ID in the second as follows:
Custom Intelligence object
Another way is to construct an intelligence object directly. This has the advantage that you can dynamically build your intelligence object based on user inputs, results of reports or other intelligence results:
The intelligenceObject can then be used as shown earlier when running a plugin:
For more recipes and details on working and constructing the intelligence object, such as specific date ranges, filters and adding model features, see the API-Library for the custom Intelligence object.
Using questions/variables
As described in the Questions & Variables page, the questions object contains end-user assignments for things such as choosing an conversion event, user/event property or any simple property such as a date or number.
Questions can be used with a custom intelligence object in a few ways.
Note that by default not specifying events, userProperties, etc. means that they are automatically added. By overriding them we can choose the features manually, more on this in the custom Intelligence object.
Below are a few examples of using question variables with the custom intelligence object:
Event variables
End-user answers what conversion event is interesting to know more about — available in the variable conversion_event, and what event could influence that conversion — available in the variable influencer_event_1.
Because events of the Intelligence object is just an array event names as strings, or event objects, we can assign them as follows:
User/event property variables
End-user picks a user property, such as campaign source, to use as a feature in the intelligence object:
Similarly event property variables can be used:
User/event item object
A helper method under user/event property variables, questions.event_price_property.item(), returns an item object which can be used directly when constructing manual items, such as a calculation:
User property variables can be used in a similar way.
Plugin input parameters from variables
Question variables can also be passed through directly to a plugins' params.
In the example below, recommend_text_field and recommender_item_text1 are Plugin Input Data variables of type text.
They can be supplied directly from any Template Variable → Event Property of type text. These question variables are always defined as Template Variables → Event Property, with the right type corresponding with the type of the plugins' input data parameter. Depending on whether the plugin input data parameter is optional, you may want to set the Template Variables → Event Property variable as optional too.
More details
For more details and recipes see the API-Library on the custom Intelligence object.
Caching
Plugin results can be cached so that on the next run we get the results directly without waiting.
Any PluginData.get call can have in the options object a setCache.
If getCache doesn't have a cached result yet, it will first run the plugin as-is and then store the results on the cache key.
Both getCache and setCache have one argument; the cache key as string. The cache key can be made up of the timestamp truncated to the day, week, etc. so we only get fresh results once per some period.
Each plugin run that uses setCache overwrites any previous cached version using the same cache key.
One scenario would be a non-standalone Insight that automatically segment a report. One Insight can be subscribed to that uses setCache to update the cluster segments in the background regularly, see example below:
Then a non-standalone Insight that segments a report can use getCache to get the clustering results directly, see example below. Note the getCache instead of setCache. In addition, we should use the same code as for the setCache example because if the end-user runs the Insight when the getCache one has not been executed yet, it will just run the plugin as that time and store the cached results:
Limitations
note
PluginData.get cannot be executed in parallel at the moment, but this will be fixed in the near future.
If you have multiple PluginData.get calls or use Promise.all, you have execute them synchronously one after another instead:
Deployable Insight
Whenever you run a deployable intelligence plugin from the Insight API, such as a prediction or recommender, and your Insight was creating using the [✅] This stand-alone Insight can be deployed, there will be a Deploy button at the Insight results page.
The end-user can then simply click the deploy button, and the platform will automatically pick up the first deployable plugin result found within the Insight, and let the user integrate that in realtime with their app or website.
The platform will take care of automatically updating and re-deploying the model based on fresh data, as long as the end-user creates the subscription.