Integrate Your Data With A React App
At Stormly we make it easy for you to integrate with React, allowing you to fully customize what you track.
Getting Started
-
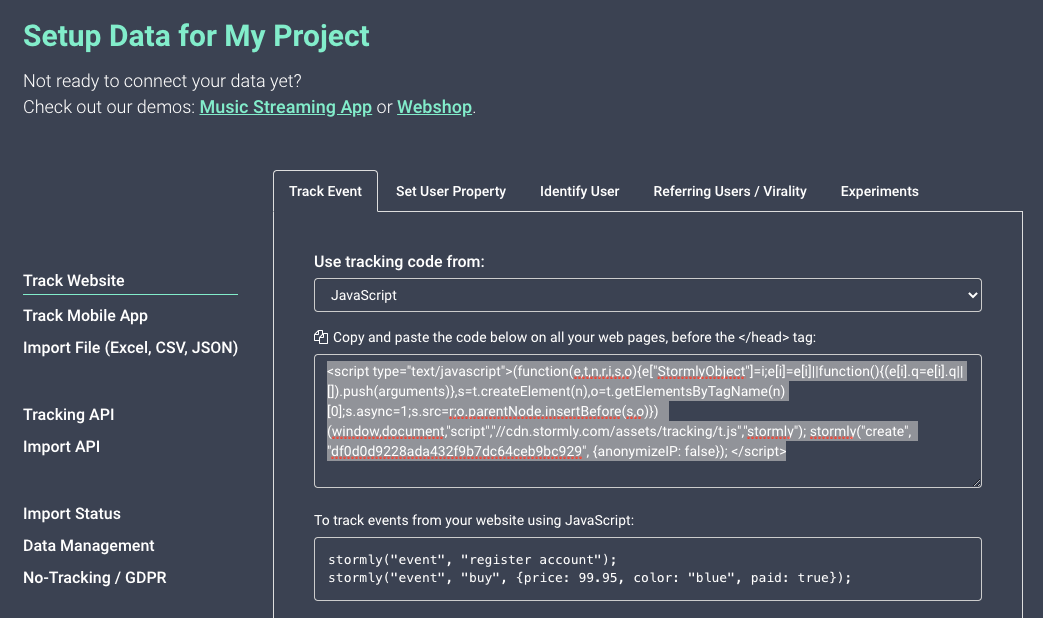
Go to the projects page inside of the Stormly application and click
Set-Up Data.
-
Under
Use tracking code from:copy and paste the script onto the (static) HTML page where you bootstrap your React app. Usually this is somewhere like index.html or app.html.
Note: Tracked data becomes available in Stormly within seconds usually, but new projects become "active" only once at least 50 unique users are tracked.
Code Examples
For all code examples in sections below, you can click the Open live example links above the code examples.
This will open a fully working HTML page for each example. You can then inspect the network requests in the developer console of you browser, and verify that a pixel image request is sent to http://t.stormly.com/.../
When you view the source for the HTML example code, make sure to replace the YOUR_STORMLY_KEY_HERE with the one from your own project. You can find it at the "Setup Data" page in Stormly.
Tracking Pages
When you have an page visit that you want to track in React, call in your code:
window.stormly("event", "viewItem", {price: 9.99, color: "blue"});
The last argument with extra properties is optional, but it's always good to add some extra properties if you have them.
Below are few code examples:
Class Component
To track page visits, call the tracking code when the component mounts. This means inside componentDidMount if you use class components, or useEffect if you use functional components:
Open live example
class HomePageComponent extends React.Component {
  constructor(props) {
    super(props);
    this.state = {};
  }

  componentDidMount() {
    window.stormly("event", "visitHomePage");
  }

  render() {
    return <h1>Welcome to the Home Page</h1>;
  }
}
Equivalent using functional hooks
Open live example
function HomePageComponent() {
  // Empty array [] means useEffect will run once, similar to componentDidMount()
  useEffect(() => {
    window.stormly("event", "visitHomePage");
  }, [])

  return <h1>Welcome to the Home Page</h1>;
}
Tracking Interactions
To track interactions like a button click, call the tracking code where the click event is handled: Open live example
class ListProductsComponent extends React.Component {
  constructor(props) {
    super(props);
    this.state = {};
  }

  componentDidMount() {
    window.stormly("event", "viewProductListing");
  }

  handleClickProduct(props) {
    window.stormly("event", "viewProduct", {color: props.color, name: props.name});
    alert("You clicked on " + props.name + " with color " + props.color);
  };

  render() {
    return <div>
      <h1>Choose an item from our webshop:</h1>
      <ul>
        <li><a href="#" onClick={this.handleClickProduct.bind(this, {name: "jeans", color: "blue"})}>Blue Jeans</a></li>
        <li><a href="#" onClick={this.handleClickProduct.bind(this, {name: "sweater", color: "red"})}>Red Sweater</a></li>
        <li><a href="#" onClick={this.handleClickProduct.bind(this, {name: "sneakers", color: "green"})}>Green Sneakers</a></li>
      </ul>
    </div>;
  }
}
Equivalent using Functional Hooks
Open live example
function ListProductsComponent() {
  // Empty array [] means useEffect will run once, similar to componentDidMount()
  useEffect(() => {
    window.stormly("event", "viewProductListing");
  }, [])

  function handleClickProduct(props) {
    window.stormly("event", "viewProduct", {color: props.color, name: props.name});
    alert("You clicked on " + props.name + " with color " + props.color);
  };

  return <div>
    <h1>Choose an item from our webshop:</h1>
    <ul>
      <li><a href="#" onClick={() => handleClickProduct({name: "jeans", color: "blue"})}>Blue Jeans</a></li>
      <li><a href="#" onClick={() => handleClickProduct({name: "sweater", color: "red"})}>Red Sweater</a></li>
      <li><a href="#" onClick={() => handleClickProduct({name: "sneakers", color: "green"})}>Green Sneakers</a></li>
    </ul>
  </div>;
}
Using Redux, MobX Or Other State Management
The examples above are enough for most cases when using React.
Even when using state libraries such as Redux or MobX, the above examples will be fine, because the tracking calls will not change any state.
Therefore, they don't have to be part of Redux or MobX state management. You can still choose to place the tracking calls inside the actions of Redux or MobX.
Identifying Users
When a user logs in, you can link their anonymous identity to one that is known by you. If for example the current logged-in user has ID user-12345, you can call in your code:
window.stormly("identify", "user-12345");Below are few code examples:
Class Component
The identify call should be made there where a valid identity is made available, after login: Open live example
class LoginPageComponent extends React.Component {
  constructor(props) {
    super(props);
    this.state = {
      username: null,
      password: null
    };
  }

  setUsername(username) {
    this.setState({username: username});
  }

  setPassword(password) {
    this.setState({password: password});
  }

  async loginUser(credentials) {
    return fetch("http://localhost:8080/login", {
      method: "POST",
      headers: {
        "Content-Type": "application/json"
      },
      body: JSON.stringify(credentials)
    }).then(data => data.json());
  }

  async handleLogin(e) {
    e.preventDefault();
    const userID = await this.loginUser({username: this.state.username, password: this.state.password});

    if (userID) {
      window.stormly("identify", userID);
      alert("Welcome " + userID);
    } else {
      alert("Invalid username/password");
    }
  };

  render() {
    return <div>
      <h1>Log-in</h1>
      <form onSubmit={(e) => this.handleLogin(e)}>
        <label>
          <p>Username</p>
          <input type="text" onChange={e => this.setUsername(e.target.value)} />
        </label>
        <label>
          <p>Password</p>
          <input type="password" onChange={e => this.setPassword(e.target.value)} />
        </label>
        <div>
          <button type="submit">Submit</button>
        </div>
      </form>
    </div>;
  }
}
Equivalent using Functional Hooks
Open live example
function LoginPageComponent() {
  const [username, setUsername] = useState();
  const [password, setPassword] = useState();

  const loginUser = async credentials => {
   return fetch("http://localhost:8080/login", {
     method: "POST",
     headers: {
       "Content-Type": "application/json"
     },
     body: JSON.stringify(credentials)
   }).then(data => data.json());
  };

  const handleLogin = async e => {
    e.preventDefault();
    const userID = await loginUser({username, password});

    if (userID) {
      window.stormly("identify", userID);
      alert("Welcome " + userID);
    } else {
      alert("Invalid username/password");
    }
  };

  return <div>
    <h1>Log-in</h1>
    <form onSubmit={handleLogin}>
      <label>
        <p>Username</p>
        <input type="text" onChange={e => setUsername(e.target.value)} />
      </label>
      <label>
        <p>Password</p>
        <input type="password" onChange={e => setPassword(e.target.value)} />
      </label>
      <div>
        <button type="submit">Submit</button>
      </div>
    </form>
  </div>;
}
Setting User Properties
To set properties on a user, such as their favorite color, use:
window.stormly("set", {favoriteColor: "blue", firstName: "Dave"});Below are few code examples:
Class Component
class ColorPickerComponent extends React.Component {
  constructor(props) {
    super(props);
    this.state = {};
  }

  handlePickColor(color) {
    window.stormly("set", {favoriteColor: color});
    alert("Your favorite colors is " + color);
  };

  render() {
    return <div>
      <h1>Choose your favorite color:</h1>
      <ul>
        <li><a href="#" onClick={this.handlePickColor.bind(this, "blue")}>Blue</a></li>
        <li><a href="#" onClick={this.handlePickColor.bind(this, "red")}>Red</a></li>
        <li><a href="#" onClick={this.handlePickColor.bind(this, "green")}>Green</a></li>
      </ul>
    </div>;
  }
}
Equivalent using Functional Hooks
Open live example
function ColorPickerComponent() {
  function handlePickColor(color) {
    window.stormly("set", {favoriteColor: color});
    alert("Your favorite colors is " + color);
  };

  return <div>
    <h1>Choose your favorite color:</h1>
    <ul>
      <li><a href="#" onClick={() => handlePickColor("blue")}>Blue</a></li>
      <li><a href="#" onClick={() => handlePickColor("red")}>Red</a></li>
      <li><a href="#" onClick={() => handlePickColor("green")}>Green</a></li>
    </ul>
  </div>;
}
A/B testing experiments
A/B testing experiments allow you to show a control or variation, based on random assignment of a user to one of these two groups.
Subsequent calls will make sure the user will always belong to the same control or variation group.
Below are few code examples where we show a payment button in blue or red, with a 50/50 chance:
Class Component
class PaymentPageComponent extends React.Component {
  constructor(props) {
    super(props);
    this.state = {
      paymentBtnColor: "blue"
    };
  }

  componentDidMount() {
    window.stormly("experiment", "ab-test-payment-btn-color", {
      control: () => {
        // This is usually an empty function. The control variation should be the default state. Blue in this case.
      },
      variation: () => {
        this.setState({paymentBtnColor: "red"});
      }
    }, {waitForContentLoaded: false});
  }

  render() {
    return <input type="button" style={{backgroundColor: this.state.paymentBtnColor}} value="Buy Item" />;
  }
}
Equivalent using Functional Hooks
Open live example
function PaymentPageComponent() {
  const [paymentBtnColor, setPaymentBtnColor] = useState("blue");

  // Empty array [] means useEffect will run once, similar to componentDidMount()
  useEffect(() => {
    window.stormly("experiment", "ab-test-payment-btn-color", {
      control: () => {
        // This is usually an empty function. The control variation should be the default state. Blue in this case.
      },
      variation: () => {
        setPaymentBtnColor("red");
      }
    }, {waitForContentLoaded: false});
  }, [])

  return <input type="button" style={{backgroundColor: paymentBtnColor}} value="Buy Item" />;
}